How To Get Arduino Running on Mac OS X (10.3.9 or later)
This document explains how to connect your Arduino board to the computer and upload your first sketch.
These are the steps that we'll go through:
- Get an Arduino board and cable
- Download the Arduino environment
- Install the USB drivers
- Connect the board
- Run the Arduino environment
- Upload a program
- Look for the blinking LED
- Learn to use Arduino
1 | Get an Arduino board and cable
In this tutorial, we assume you're using an Arduino Duemilanove or Diecimila. If you have another board, read the corresponding page in this getting started guide.
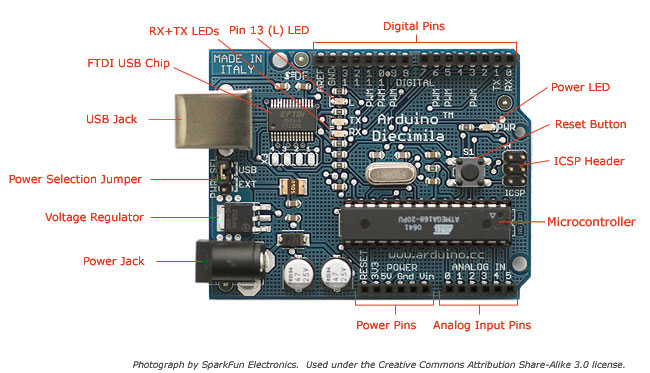
The Arduino is a simple board that contains everything you need to start working with electronics and microcontroller programming. This diagram illustrates the major components of an Arduino Diecimila. (The Arduino Duemilanove is almost identical.)
You also need a standard USB cable (A plug to B plug): the kind you would connect to a USB printer, for example.
2 | Download the Arduino environment
To program the Arduino board you need the Arduino environment.
Download: the latest version from the download page.
When the download finishes, unzip the downloaded file. Make sure to preserve the folder structure. Double-click the folder to open it. There should be a few files and sub-folders inside.
3 | Install the USB drivers
If you are using a USB Arduino, you will need to install the drivers for the FTDI chip on the board. These can be found in the drivers directory of the Arduino distribution.
You'll need to select the correct drivers for your computer. Use:
- FTDIUSBSerialDriver_v2_1_9.dmg for older (PPC) Macs like the Powerbook, iBook, G4 or G5
- FTDIUSBSerialDriver_v2_2_9_Intel.dmg for newer (Intel) Macs like the MacBook, MacBook Pro, or Mac Pro
(The latest version of the drivers can be found on the FTDI website.)
4 | Connect the board
On the Diecimila, the power source is selected by the jumper between the USB and power plugs. To power the board from the USB port (good for controlling low power devices like LEDs), place the jumper on the two pins closest to the USB plug. To power the board from an external power supply (6-12V), place the jumper on the two pins closest to the power plug. On the Duemilanove, the power source is selected automatically (there is no power selection jumper). In any case, connect the board to a USB port on your computer.
The green power LED (labelled PWR) should go on.
5 | Run the Arduino environment
(Mac OSX): Copy the Arduino application to your Applications directory. Double-click the Arduino application.
(Windows): Open the Arduino folder and double-click the Arduino application.
6 | Upload a program
Open the LED blink example sketch: File > Sketchbook > Examples > Digital > Blink.
Select the serial device of the Arduino board from the Tools > Serial Port menu. On the Mac, this should be something with /dev/tty.usbserial in it.
You'll need to select the entry in the Tools > Board menu that corresponds to your Arduino. For newer Arduino boards with an ATmega328 (check the text on the chip on the board), select Arduino Duemilanove w/ ATmega328. Previously, Arduino boards came with an ATmega168; for those, select Arduino Diecimila or Duemilanove w/ ATmega168.
Now, simply click the "Upload" button in the environment. Wait a few seconds - you should see the RX and TX leds on the board flashing. If the upload is successful, the message "Done uploading." will appear in the status bar. (Note: If you have an Arduino Mini, NG, or other board, you'll need to physically present the reset button on the board immediately before pressing the upload button.)

7 | Look for the blinking LED
A few seconds after the upload finishes, you should see the pin 13 (L) LED on the board start to blink (in orange). If it does, congratulations! You've gotten Arduino up-and-running.
If you have problems, please see the troubleshooting suggestions.
8 | Learn to use Arduino
The text of the Arduino getting started guide is licensed under a Creative Commons Attribution-ShareAlike 3.0 License. Code samples in the guide are released into the public domain.